cvtcolor() converts an image from one color space to another.
Syntax :
C++:void cvtColor(InputArray src, OutputArray dst, int code, int dstCn=0 )
Parameter:
src :– input image: 8-bit unsigned, 16-bit unsigned ( CV_16UC... ), or single-precision floating-point.
dst :– output image of the same size and depth as src.
code :– color space conversion code (see the description below).
dstCn :– number of channels in the destination image; if the parameter is 0, the number of the channels is derived automatically from src and code.
As it has already been mentioned that the functions converts an image form one color space to another, there are various types of conversion possible.
Original Image:

RGB to Grey Image:

BGR to Grey Image:

RGB to YCrCb Image:

BGR to YCrCb Image:

RGB to HSV Image:

BGR to HSV Image:

RGB to Lab Image:
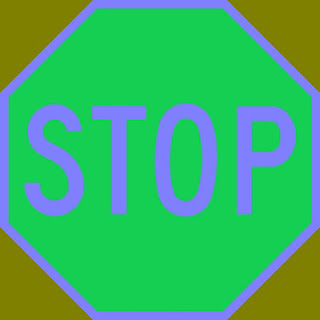
BGR to Lab Image:

RGB to Luv Image:

BGR to Luv Image:

RGB to XYZ Image:

BGR to XYZ Image:

Syntax :
C++:void cvtColor(InputArray src, OutputArray dst, int code, int dstCn=0 )
Parameter:
src :– input image: 8-bit unsigned, 16-bit unsigned ( CV_16UC... ), or single-precision floating-point.
dst :– output image of the same size and depth as src.
code :– color space conversion code (see the description below).
dstCn :– number of channels in the destination image; if the parameter is 0, the number of the channels is derived automatically from src and code.
As it has already been mentioned that the functions converts an image form one color space to another, there are various types of conversion possible.
| Transformation | Syntax |
|---|---|
| RGB to YCrCb | CV_RGB2YCrCb |
| BGR to YCrCb | CV_BGR2YCrCb |
| YCrCb to RGB | CV_YCrCb2RGB |
| YCrCb to BGR | CV_YCrCb2BGR |
| Transformation | Syntax |
|---|---|
| RGB to HSV | CV_RGB2HSV |
| BGR to HSV | CV_BGR2HSV |
| HSV to RGB | CV_HSV2RGB |
| HSV to BGR | CV_HSV2BGR |
| Transformation | Syntax |
|---|---|
| RGB to CIE L*a*b* | CV_RGB2Lab |
| BGR to CIE L*a*b* | CV_BGR2Lab |
| CIE L*a*b* to RGB | CV_Lab2RGB |
| CIE L*a*b* to BGR | CV_Lab2BGR |
| Transformation | Syntax |
|---|---|
| RGB to CIE L*u*v* | CV_RGB2Luv |
| BGR to CIE L*u*v* | CV_BGR2Luv |
| CIE L*u*v* to RGB | CV_Luv2RGB |
| CIE L*u*v* to BGR | CV_Luv2BGR |
| Transformation | Syntax |
|---|---|
| RGB to CIE XYZ | CV_RGB2XYZ |
| BGR to CIE XYZ | CV_BGR2XYZ |
| CIE XYZ to RGB | CV_XYZ2RGB |
| CIE XYZ to BGR | CV_XYZ2BGR |
//OpenCV C++ Code for ColorSpace Conversion
#include "opencv2/core/core.hpp"
#include "opencv2/highgui/highgui.hpp"
#include "opencv2/imgproc/imgproc.hpp"
#include "iostream"

using namespace cv;

int main( )
{
// char* imageName = argv[1];

 Mat image;
 image = imread( "C:\\Users\\arjun\\Desktop\\color-image.png", 1 );

 Mat RGB2GRAY_image;
 cvtColor( image, RGB2GRAY_image, CV_RGB2GRAY );

 Mat BGR2GRAY_image;
 cvtColor( image, BGR2GRAY_image, CV_BGR2GRAY );

 Mat RGB2YCrCb_image;
 cvtColor( image, RGB2YCrCb_image, CV_RGB2YCrCb );

 Mat BGR2YCrCb_image;
 cvtColor( image, BGR2YCrCb_image, CV_BGR2YCrCb );

 Mat RGB2HSV_image;
 cvtColor( image, RGB2HSV_image, CV_RGB2HSV );

 Mat BGR2HSV_image;
 cvtColor( image, BGR2HSV_image, CV_BGR2HSV );

 Mat RGB2Lab_image;
 cvtColor( image, RGB2Lab_image, CV_RGB2Lab );

 Mat BGR2Lab_image;
 cvtColor( image, BGR2Lab_image, CV_BGR2Lab );

 Mat RGB2Luv_image;
 cvtColor( image, RGB2Luv_image, CV_RGB2Luv );

  Mat BGR2Luv_image;
 cvtColor( image, BGR2Luv_image, CV_BGR2Luv );

 Mat RGB2XYZ_image;
 cvtColor( image, RGB2XYZ_image, CV_RGB2XYZ );

 Mat BGR2XYZ_image;
 cvtColor( image, BGR2XYZ_image, CV_BGR2XYZ );

 namedWindow( "original image", CV_WINDOW_AUTOSIZE );
imshow( "original image", image );

namedWindow( "RGB2GRAY image", CV_WINDOW_AUTOSIZE );
imshow( "RGB2GRAY image",RGB2GRAY_image );
imwrite( "C:\\Users\\arjun\\Desktop\\RGB2GRAY.jpg", RGB2GRAY_image );

namedWindow( "BGR2GRAY image", CV_WINDOW_AUTOSIZE );
imshow( "BGR2GRAY image", BGR2GRAY_image );
imwrite( "C:\\Users\\arjun\\Desktop\\BGR2GRAY.jpg", BGR2GRAY_image );

namedWindow( "RGB2YCrCb image", CV_WINDOW_AUTOSIZE );
imshow( "RGB2YCrCb image", RGB2YCrCb_image );
imwrite( "C:\\Users\\arjun\\Desktop\\RGB2YCrCb.jpg", RGB2YCrCb_image );


namedWindow( "BGR2YCrCb image", CV_WINDOW_AUTOSIZE );
imshow( "BGR2YCrCb image", BGR2YCrCb_image );
imwrite( "C:\\Users\\arjun\\Desktop\\BGR2YCrCb.jpg", BGR2YCrCb_image );

namedWindow( "RGB2HSV image", CV_WINDOW_AUTOSIZE );
imshow( "RGB2HSV image", RGB2HSV_image );
imwrite( "C:\\Users\\arjun\\Desktop\\RGB2HSV.jpg", RGB2HSV_image );

namedWindow( "BGR2HSV image", CV_WINDOW_AUTOSIZE );
imshow( "BGR2HSV image", BGR2HSV_image );
imwrite( "C:\\Users\\arjun\\Desktop\\BGR2HSV.jpg", BGR2HSV_image );

namedWindow( "RGB2Lab image", CV_WINDOW_AUTOSIZE );
imshow( "RGB2Lab image", RGB2Lab_image );
imwrite( "C:\\Users\\arjun\\Desktop\\RGB2Lab.jpg", RGB2Lab_image );

namedWindow( "BGR2Lab image", CV_WINDOW_AUTOSIZE );
imshow( "BGR2Lab image", BGR2Lab_image );
imwrite( "C:\\Users\\arjun\\Desktop\\BGR2Lab.jpg", BGR2Lab_image );

namedWindow( "RGB2Luv image", CV_WINDOW_AUTOSIZE );
imshow( "RGB2Luv image", RGB2Luv_image );
imwrite( "C:\\Users\\arjun\\Desktop\\RGB2Luv.jpg", RGB2Luv_image );

namedWindow( "BGR2Luv image", CV_WINDOW_AUTOSIZE );
imshow( "BGR2Luv image", BGR2Luv_image );
imwrite( "C:\\Users\\arjun\\Desktop\\BGR2Luv.jpg", BGR2Luv_image );

namedWindow( "RGB2XYZ image", CV_WINDOW_AUTOSIZE );
imshow( "RGB2XYZ image", RGB2XYZ_image );
imwrite( "C:\\Users\\arjun\\Desktop\\RGB2XYZ.jpg", RGB2XYZ_image );

namedWindow( "BGR2XYZ image", CV_WINDOW_AUTOSIZE );
imshow( "BGR2XYZ image", BGR2XYZ_image );
imwrite( "C:\\Users\\arjun\\Desktop\\BGR2XYZ.jpg", BGR2XYZ_image );

 waitKey(0);

 return 0;
}
Original Image:

RGB to Grey Image:

BGR to Grey Image:
RGB to YCrCb Image:

BGR to YCrCb Image:

RGB to HSV Image:

BGR to HSV Image:

RGB to Lab Image:

BGR to Lab Image:

RGB to Luv Image:

BGR to Luv Image:

RGB to XYZ Image:

BGR to XYZ Image:

